I want this blog to INSPIRE your CREATIVE side as we EXPLORE our PASSION together!

Tuesday, November 30, 2010

Grand Opening Blog Hop


This is just a preview that Flaunt it Fridays will have it's first blog hop this coming FRIDAY!!! Whoo Hoo. You won't want to miss it!

Christmas Card - Tree Scene 3


Here is the 3rd of the 4 Tree Scene Cards I made using this beautiful paper. All I did was cut additional trees and pop dot them over the trees there and then add a bit of ribbon. Super simple.

Just Because Card - Thinking of You Birdie!

Here is a cute simple card I made up the night before the craft fair. This cute bird is from Simply Charmed. Love it! I love the colors in this card. I made a few cards using this color combo and I just love them. Hope you enjoy.

Monday, November 29, 2010

Birthday Card - Colorful Dragon Fly


This was a really simple yet so pretty card I made just before the craft fair. This dragon fly is from the Creative Memories Cheerful Seasons Cartridge and I love it. This time I glued the center of the dragon fly right to the card and then used a tiny pop dot under each wing toward the inner end, so the wings look raised up as if in flight. I really like that effect rather than popping the entire thing. I really love all these colors together. Hope you enjoy.

Winter Card - Let It Snow


So cute! This was similar to another snowman card that posted a week or so ago. I love this snowman from the Creative Memories Cheerful Seasons! The paper is adorable too. Over all this is a very simple card but something about it just pops at me.

Sunday, November 28, 2010

Just Becase Card - Thinking of You Butterflies!


I am in love with this card. Love the colors and then sentiment and the butterflies. I had a 50 percent off coupon which I used at AC Moore the night before my craft fair and I grabbed up this butterfly border punch by Martha Stewart. I didn't yet get the corner punch but I may at some point. Anyway this is a nice match to my MS Butterfly punch shown here and the smaller butterfly one I use off and on. I had to grab it. Just look what a pretty border that makes and how perfectly it goes with my other punch! I really love this patterned paper too! This card has no Cricut, but it is lovely and it was super fast to make! Hope you enjoy.

Saturday, November 27, 2010

Home Decor - Happy Holidays Penguin


This is another request from my sister. She loved the penguin Christmas cards I had made and since they sold at the craft fair she asked me to make her something with the penguin. I had my Gypsy with me on Thanksgiving so we designed this together. She decided on a large penguin all decorated that she is going to give to her suite mate to hang on their door at college. If you ask me this is going to be totally adorable! I added some snowflakes to it just for an added touch with some pink gems and then stickles around the gems. The stickles weren't quite dry when I took the picture, as I had to get this posted for her tonight. I am really happy with this. I was thinking how when you have a Cricut, you really have no reason to buy decorations, when you can so easily make your own! Hope you all enjoy.

Friday, November 26, 2010

Christmas Card - Happy Holidays Snowy Tree


My sister liked the other Christmas Card I had made using this snowy tree and so she requested that I make her one too! This one is different as I used other papers but and this time I used red gems on the tree. I also added Diamond Stickles to the snow to make it raised up and sparkly. I love how this card turned out. And I really like the Divine Swirl Embossing on the top part. This is one of my favorite trees. It is so cute. I hope you enjoy the card, as well as my sister.

Oh and on a side note...I just created my own blog button last night, it is located on my side bar. I made it myself to match my blog design which was my own design! Anyway feel free to grab it and post it on your site if you so desire.

Thursday, November 25, 2010

Birthday Card - Beehive and Bee Shape Card


Look at this cutie!!! I am so in love with my Gypsy now. As soon as I was flipped through my carts on there and saw this bee hive I knew I had to make it into a shape card and add the adorable Bee from Create a Critter. Look how cute this is. I made the height of this so it fits in a 5.5x5.5 envelope. I just welded it but from the front you can't see that because I put the entire front over the welded front. The bee is darn cute. I added black stickles to her black parts and pink stickles to her wings and cheeks. I added some bling and silver stickles to each of the flowers. The flowers were an accessory or layer on another Create a Critter button, I just can't remember which. I used my black Micron pen to stitch all around the bee hive and the bee and that just gives it an added touch and makes it stand out more. I used black Staz-on ink for the sentiment. That is my favorite so far. I really love making shape cards and now with the Gypsy I can do it so much easier!!!

Let's see...just for fun, I ask you to leave me a comment on this post with a link to a shape card you have made. If you haven't ever made one, give it a try. But if not you can still leave me a comment anyway, cause I really love your comments. They brighten any day!

Hope you enjoy.

Oh and don't forget to see the amazing post directly under this one to check out a new Challenge Blog... You wouldn't want to miss that!

Wednesday, November 24, 2010

Grand Opening of "Flaunt It Fridays"....Very EXCITING!!!

Photobucket


I have been keeping a secret for the past week. Myself and 10 other wonderful crafters are part of a brand new design team on a brand new challenge blog!!! Just click the button here in this post and hurry on over to the new site!

It is going to be so exciting. There will be a challenge every Friday starting on December 3rd and we are also having a grand opening give away too!!!

To be entered for our give away of a Peachy Keen Stamp Set, all you have to do is go become a follower of the new site, leave a comment, and also post one of our buttons on your own blog to help spread the word! So easy!

The purpose of the new blog is to encourage you to use your Cricut Cartridges and Flaunt it!!! It's going to be a blast!

Also check out the amazing blogs of the rest of the entire Design Team!!!

Here is the list:

Sandra Co-Founder http://365daysofcricut.blogspot.com/
Janis Co-Founder http://pausedreamenjoy.blogspot.com/
Theresa http://www.thescrapbookingqueen.com/
Amanda http://www.myscrappinobsession.com/
Christina http://cardcreationsbyc.blogspot.com/
Stephanie http://www.alwayscrafting.com/
Jess http://myscrapdiary-jess.blogspot.com/
Ruthie http://septemberninth.blogspot.com/
Dorcas http://4craftyangels.blogspot.com/
Laurel http://www.blog.littlepeaceofmyheart.com/
Raven http://love4stamps.blogspot.com/

Christmas Card - Snow Flake Quilt Let it Snow


Wow...this card is really something, LOL. I played around with a quilted look by adhering all these 1 inch squares like this. The red squares already have a snowflake pattern on them and then on the green squares I used my Martha Stewart Snow Flake Punch and raised those up on pop dots and added stickles. It really is something to look at. LOL. Hope you enjoy.

Tuesday, November 23, 2010

More Blog Awards!!!


The lovely Sharon gave me these blog awards! Thank you so much!

Now I am to tell 3 things that make me different and then pass on to 5 other bloggers.

1. I love to chew gum, but my choices are very limited since I am allergic to aspartame :(

2. I love my blackberry, I am technology junkie.

3. I love to reach Nicholas Sparks.

Now to pass this onto 5 other bloggers:

Molly: http://armywifelearnsthecricut.blogspot.com/

Momo: http://madebymomo.blogspot.com/

Stephanie: http://www.alwayscrafting.com/

Amanda: http://www.myscrappinobsession.com/

Tammy: http://scrappycritters.blogspot.com/

Stylish Blogger Award!!!


A big thank you to Karey for this award!!! Always such a surprise to see you have been given an award!

There are only a few simple rules that you have to follow if you receive this award:

1.Thank and link to the person who awarded you this.
2.Share 8 things about yourself.
3.Pay it forward to 8 bloggers that you have recently discovered.
4. Contact those bloggers and tell them about their award.

So...8 Things about me....

1. I was born on Friday the 13th in May...and the day I was born there was a blizzard.

2. My middle name is Marie

3. I am a horrible nail biter.

4. I love my Thursday night TV, Grey's and Private Practice!

5. I have never broken a bone.

6. I have a 12 year old beagle named Toby and he is my baby.

7. My favorite color is supposed to be purple but yet I use way more pink in my crafts.

8. I can be really shy sometimes when I get to know new people.

Ok...now onto 8 bloggers to give this award to:

Sandra: http://365daysofcricut.blogspot.com/

Maria Elena: http://mariaelenaworld.blogspot.com/

Carri: http://doubleclickconnections.blogspot.com/

Lin: http://azlina-lin.blogspot.com/

Cristi: http://scrappin5littlecupcakes.blogspot.com/

Trish: http://techniquesbytrish.blogspot.com/

Dorcas: http://4craftyangels.blogspot.com/

Linda: http://www.krazyquilling.com/

Monday, November 22, 2010

Congratulations Card - Turtle with Hearts


Here's my second Gypsy card. I remember a while back seeing on www.craftingwithcristina.com a layout she made using this cute turtle from Create a Critter and she had taken out the circles and replaced them with hearts. So I decided to try that, because I love turtles and I wanted to do that one since I saw hers. So I hid the circles and added in the hearts in these two sizes. So cute. I really love how this cut turtle turned out. I just added some grass and embossed the yellow paper and then added those buttons. Pretty simple. Oh and I totally am in love with how I can just lay out my papers on the mat to match my Gypsy layout perfectly. And now this turtle is saved so I can make it any time I want to again. Gee what did I do before my Gypsy!

Oh I have 22 more posts to be made just from stuff I made before the craft fair...so I will try to mix some things in between them so you don't get sick to death with Christmas.

Sunday, November 21, 2010

New Home Card - Very FIRST Gypsy Card!!!


Awesome news....as my readers know I have been working my tail off for a craft fair that was yesterday. I mean I really was spending nearly all my free time the past many many weekends making as much as I could. I am really proud to say that it went very well, and even considering I had the worst location at the craft fair, I did great! I made enough to get my Gypsy finally and I even have some money left to do other things with. I feel very happy about this. The mini notebooks I was making were a HUGE hit. I had 102 with me and came home with maybe 10. Other than that I sold cards, lots of cards. None of my quilled art work sold at all but I will list it on Etsy...and I can always use it for gifts now that it is all framed nicely.

Anyway...I came home and I played with my Gypsy...first I had to update it and all that jazz. Then I watched all 9 of Christina's videos on the Gypsy Series at www.creationswithchristina.com. I highly suggest you watch her videos. Just go to her blog and click on video series and then you will see her Gypsy Series. Once I watched all 9 I pretty much know how to do everything I need to do on my new toy! I love it, and I am grateful for her video!

So onto my first Gypsy card. Some of you know I had made shaped cards without a Gypsy by creating my hinges, but of course being able to do it with welding is much better. So I decided my first card would be a shape card. I used this little house from Create a Critter, from one of the accessory buttons. I just love it. I made it to fit a 5.5x5.5 envelope. I welded and the two houses together, hid the contour on the back side of the house so it wouldn't cut out the etch marks. Then I cut another front of the house so there wouldn't be the flat side. I cut another house without the etch marks and just trimmed the side off to go onto the inside layer. I did the layers so I hid some of the cuts with the hide contour so that I could get my roof a different color and the heart and so forth. It was so stinking easy to lay these pieces on the mat and know exactly where they would cut. I love that. No more messed up sizes.

I made some punched out flowers for the window box, and I placed the white paper on the inside so that the window would appear white from the front. I drew the black lines there. Then I felt that it was missing something around the window, to make it prettier, so I just punched using my normal hole punch a whole bunch of circles and glued them around the window...I LOVE how that turned out. It just makes the window pop to me. The roof I felt needed something too, so I cut those thin strips of pink paper and attached it and then just used a lot of pink bling to further decorate it and a little stitching with my white gel pen. For my sentiment I just wanted it on the pink paper and I added that beneath the window.

On the inside I added a gift card pocket. I like the light pink house layer inside to make the back of the card more sturdy. I really adore how this turned out and I cannot believe how easy it really was. I hope you enjoy....

Winter Card - Warm Wishes Snowman


I think this card turned out adorable. I love the soft colors with the pink and blue. So pretty. I used my Ribbon Loop Border Punch at the bottom and then embossed the pink paper. On the snowflakes I used my Frosted Lace Stickles. These little Martha Stewart Snowmen were really a good buy for me because it has allowed me to make many cards this weekend without having to make all those Cricut cuts when I am down to the wire. The 5.5 square size card is actually really fun to work with. I am really enjoying it. Hope you enjoy.

Saturday, November 20, 2010

Christmas Card - Cocoa Merry Christmas


This image came from Creative Memories Cheerful Seasons. Where I added the red gems were just little cut out circles but I liked the gem look more on it. The pattern paper is from DCWV Christmas Stack. Nice subtle pattern to it. This card is really very simple but turned out cute I think. Something different for me. Hope you enjoy.

Friday, November 19, 2010

Christmas Card - Holiday Cheer Mouse


Another Christmas Card made using Winter Frolic and a bit of thinking outside the box. Who says Christmas Cards have to have your usual Christmas colors. For this I wanted to use some scraps of my paper and also just something different. I really am getting a lot of use out of this snowflake punch. I love it. The crimped paper adds some dimension. This mouse is pretty simple, not much layering at all, but still cute. Hope you enjoy.

Thursday, November 18, 2010

Winter Card - Let it Snow Snowman


Here is another 5.5x5.5 card I made using those Martha Stewart Snowmen. For this one I wanted to pull out the light blue and green that the snowman had and use that. SO I made a white mat and then I made a mat that was blue and green strips of paper. Very soft and pretty paired up with the brown. The brown ribbon came from the dollar store. My Dollar Tree has lots of pretty colors in this style of ribbon. I don't like knotting them when the ribbon is this wide, so I just use it as a decorative strip. The let it snow sticker is also from Martha Stewart and I love how it made it look like some snowy hills and the sentiment goes across the top and the bottom. The sticker snowflakes are also from her line. Well heck even the snowflake punch is too. So I guess this card should do her proud, except I used Recollections Paper. Hope you enjoy.

Wednesday, November 17, 2010

Thanksgiving Card - CJ Too Design Team Project!


Here is my latest design team project for Tracy at www.craftjunkietoo.com. This time around we were to make a project having to do with Fall and Being thankful. I decided to make a card, and I had to use my favorite little turkey from Create a Critter. I made an Easel Card and it turned out super cute. I added some bling and doodling to it too! I think it is adorable...and it is a nice big card. I hope you all enjoy!

Tuesday, November 16, 2010

More More More Mini Composition Books


So I have been still plugging away at these in between cards. These are the latest batch that I made. Each one is made 2-4 times, depending how much paper I have. I have to count but I know I should have over 70 by now. So far everyone who has seen these just love them and would gladly pay a buck for one. So I really hope it was worth all the hours I spent making these. Also I was able to include one in an etsy order for a free bonus because the shipping charges ended up being a little higher than it cost me, so I threw one in. So I think even after the craft fair these are going to come in handy for me too. I can't wait to see which design I choose to put in my purse too. I just can't decide. Hope you enjoy.

Christmas Card - Two Snowman Seasons Greetings


I bought some 5.5x5.5 envelopes this weekend and these sort of cute 3D stickers from Martha Stewart. I loved the snowmen ones and I love how they are similar to using Cricut Images. I needed something faster for me to make a bunch more holiday cards. I don't like to use much of any stickers but since these look like elements I could make I decided to get them. There were 8 in a pack and I got 2 packs. It did help, I was able to make several of this size card in one evening. For this one I went with the Divine Swirl pattern and my Threading Water punch at the base. I accented each scallop with a tiny red gem. So pretty. The wide green ribbon came from the dollar store. I love how these two snow people matched in colors, so I paired them up together and added some snowflakes. The sentiment is from a dollar stamp at Michael's. I really love how this card turned out. Now I just hope my cello bags for this size card arrive this week before my craft fair so they can be professionally packaged. Hope you enjoy.

Monday, November 15, 2010

Christmas Card - Snowman Make the Season Bright


This card turned out super cute. I used the Creative Memories Cheerful Seasons cartridge. The layers to the snowman are different. I was able to have this light blue layer included. I think it's a really cute snowman. I used a pattern paper from Me and My Big Ideas. Super cute. I added some wide ribbon that I got at the dollar store, and some snowflakes. I just love these tiny sentiments that I used my coupon for last week. They are the perfect size for A2 cards. Stay tuned for a similar card soon too. Hope you enjoy.

Sunday, November 14, 2010

A Few Things....

I just wanted to say again that I LOVE your comments!!! I know I don't get to answer to all of them, but each one puts a smile on my face. I have noticed some new commenters and followers the past week or two. Thank you so much!

I would like to mention that if you have a question or something that you want to have answered right away then feel free to email me. That is much easier for me because my emails all come to my phone and then I can answer you quicker and not have to wait till I am home and answer. My email is listed on the side bar right under my picture.

Hopefully once my craft fair is done with next weekend I can slow down a bit and make more projects that I can do videos of. I have just been trying to use my free time to be as productive as I can be.

So far I think I have 153 cards, 99 Mini Notebooks and Several Quilled Framed Artwork to sell at my craft fair. I think around 42 are Christmas Cards or Wintery Cards. I still have a few more days though I don't tend to get too much done on week nights. I'm pretty happy with all that I accomplished.

Remember if you want to see videos of certain cards types or have anything you want to know, just let me know! I'll do my best to get back to you as soon as I can.

Also if I am not following your blog and you would like me to, leave me a comment here with a link. I love to check out your creations too!

Christmas Card - Holiday Cheer Pink Penguin


I love this cute penguin from Simply Charmed. How adorable this is. Stay tuned for a card I made using blues too. Last weekend I knew I needed to start really hammering out the Christmas cards since my craft fair is now so close, so I decided the cards had to be somewhat simple, but I also had to go outside the box a bit and use bright colors sometimes or I would get bored. The cuttlebug snowflake folder is probably my most used as of right now, because it goes perfectly with the Christmas Cards and my Martha Stewart Snowflake punch. And speaking of that punch, it has had a lot of use and I got it at 50 percent off on clearance when my Wal-Mart decided to stop carrying most of it's scrapbooking stuff. I am so glad I grabbed it up!

I decided to use my Martha Stewart Glitter Glue to bling my penguin along with a gemstone. The belly is so big that I decided to just put my sentiment there with this scallop circle. A simple card but really cute and pretty. Stay tuned for the blue one. In fact I have 22 posts to make just from items I made last weekend and this weekend so far.

Saturday, November 13, 2010

Christmas Card - Santa Ho Ho Ho


I just love the Santa from Simply Charmed. So cute! I decorated him with stickles. I also just accented with some ribbon and a border punch. I can't get too fancy with some of these cards as I need to get many more Christmas cards done for my craft fair. Hope you enjoy.

Friday, November 12, 2010

Christmas Card - Reindeer and Ribbon


No Cricut on this card. I actually just cut this strip of reindeer from a DCWV paper. I thought they were so cute and would make a nice accent on a card. I decided to keep it really simple and just accented with ribbon at the top! Hope you enjoy.

Christmas Card - Snowy Tree


Yay...I love the Creative Memories Cheerful Seasons Cartridge. This cute snowy tree is adorable. I added the green gems to it and frosted lace stickles to the snow. Just kept this one very simple otherwise so the tree would really stand out. I just love this cut. Hope you enjoy.

Thursday, November 11, 2010

Christmas Card - Tree Scene 2


So I really need to get going on many more Christmas Cards before my craft fair in two weeks. So I bought a couple of Christmas paper packs and decided that I needed to keep some of the cards simpler and quicker to make. For this card what I did was use a nice DCWV pattern paper and I also cut some of the trees out of a different spot of the paper and used pop dots to raise them up and place them right over the same tree on the paper, so it gives it that dimension but took less time than cricut cuts would. I used a coupon on the Hero Arts 6 Mini Christmas Stamps and I really like them because of the small size. I don't have to leave quite as much room left for them. Look out for 3 more similar cards to this one. Hope you enjoy.

Even More Mini Composition Books


Here are some more designs I have made so far, I make 2-4 of each design. I just love these so much! In case you missed my video on how to make these just visit my video page linked at the top of my site here and you can watch Episode 3! Hope you enjoy.

Wednesday, November 10, 2010

Sympathy Card - Card for my Friend- Peace


My good friend's father passed away last week and my friend had to make a trip back home to be there before and during, as well as stay for the services. I wanted to make her a card that was really serene and peaceful and I chose the blue and white and the word peace. I decided to try a tag style card in a 6x6 size. I really like this style for this size. It would be nice to have a scene card this size and style too! Anyway I stamped my letters and I used my Cuttlebug to emboss the white paper and then I went over the embossed parts with Stickles. I had plenty of room on the inside to write her a note. Hope you enjoy.

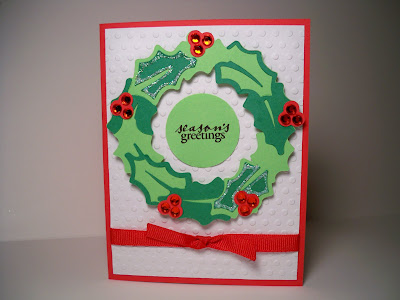
Christmas Card - Wreath


So, I am so super excited. When I first got my Cricut, one cartridge I wanted most was the Creative Memories Cheerful Seasons. I thought that this could be purchased in the craft stores and didn't put two and two together that it is actually a Creative Memories item. I used to be a consultant a while back, but stopped after the Palette Systems came out and I didn't care for their new styles. Anyway today I was at a Holiday Craft Fair with my aunt and a CM consultant was there with the cartridge and I was able to glance the handbook and I knew I had to get it. She was also offering free shipping on all orders purchased today. I really am loving this cartridge. The wreath came from it! Hope you enjoy.

Tuesday, November 9, 2010

Christmas Card - Tree Scene 1


Here is another of my Christmas Cards using this tree paper with some of the trees raised up. Simple and pretty! I love how the paper has the glittery snow. Hope you enjoy.

Christmas Card - Green Trees


This card is very simple and I did not use the Cricut at all for it. The little trees are from a craft punch I have had for many years. I just wanted to make another simple card and I like how this turned out. I really like the trees placed against the crimped background. Hope you enjoy.

Monday, November 8, 2010

Episode 4 - Gift Bag Shape Card - Christmas


I had a request from a reader for a video tutorial on how I make my shape cards, particularly the gift bag style one, without the gypsy and design studio. This video turned out better because I had prepped more ahead of time to make myself able to do this in just one video clip. I absolutely love how this card turned out and I hope you enjoy the video! Leave me a comment and let me know.


And here is the final picture of the card with the doodling and stickles added. I really love this card so much. Hope you enjoy!

Challenge Extended Again

So...there really has been a lot of blog hops and challenges going on in blog world. I am going to extend my current challenge to end the day before Thanksgiving in the hopes that more of you can join in. Right now half the people who have done the challenge were my guest designers.

So please join in, all entries will be accepted and if you have any other friends who might want to participate send them over! I have not decided the prize yet, but I am sure it will be something fun. Besides the real fun of a challenge is a challenge!

Sunday, November 7, 2010

Custom Order - Animal Train Baby Card


So a woman I know is going to be a first time grandmother soon and her daughter doesn't know what she is having. She asked me to make a gender neutral card for the new baby, and she wanted it to be something special to her daughter. I took a good week or week and a half to think of my idea. When I know I want to create something specific based on an idea I take scrap paper and pen and I sketch it out. Once I have it all sketched I can throw away the paper and it's etched in my head. Kind of weird how it works out. I decided to make an Easel card, but I wanted it to be a full 8.5x5.5 for the size of the card. I doubled up some of the paper layers to make this thick and sturdy. I thought an easel card would be nice in case she wants to display it in the baby's room.

This little train of animals I had seen on Momo's blog before. Although I think she might have done three. I thought of the idea to have the giraffe head in the drivers seat, LOL. I love how that turned out. I had wished I could have had three animals trailing the train but there just wasn't room and any smaller and these animals would have cut horribly. I am happy with how this turned out though.

I decided the top corner needed something and I did the little sun from Create a Critter. The ribbon and buttons are just a nice touch. I love what I came up with for the words. I did run the idea and the writing by my customer before making the card and I haven't given it to her yet, so I really hope she loves it as much as I do. This card took me 3 hours from start to finish. Hope you enjoy.

Saturday, November 6, 2010

Episode 3 - Mini Composition Books


This video shows you how to make a mini composition book. Really easy and super cute. I hope you enjoy it and I plan to make a video soon about how to make the gift bag card I have made a couple of times. I had a request for that one too!

Wednesday, November 3, 2010

CJ Too Design Team - Happy Fall Wall Hanging


So it is time for another Craft Junkie Too Design Post! This week we had to make something in the air, to be hung, so I made this Home Decor Wall Hanging. The fence and the grass is from Paper Doll Dress up. I made like 5 layers of fence so it was nice and thick. I went around each of the fence posts with the braiding cord and buttons to make the actual fence more festive. The pumpkins were from Create a Critter. So cute. I just added glitter to the stems, mouths and eyes. I made them all raised up but the lighter one is more raised up than the other two. The letters are from Storybook.

I am really happy with how this turned out. I gave it to a friend of mine just because and she loved it. It is so awesome to know that such cute crafts can really be made from just paper and a few accessories. Hope you enjoy.

>